Wplms Continue Course Not Working When Student Logs Out
WPLMS supports WordPress 3.0 Menus.
There are 4 Menu locations in WPLMS.
- Top Menu
- Main Menu
- Footer Menu
- Mobile Menu
Top Menu is located at the top of header, besides the login and signup links. This menu is hidden on Mobile devices. This menu does not support multi-level items.
Main Menu is located in the header. This menu also supports Mega Menu. This menu is hidden on Mobile devices.
The Footer Menu located in the Footer bottom in the right corner. This menu does not support multi-level items.
Mobile Menu is the Slide out menu. It appears only on Mobile layouts when the user clicks on the Menu icon placed in the header in Mobile layouts. This menu does not support multi-level items.
Setting Up a Menu is really simple. Follow below steps to setup a Menu :
- Login to WP Admin panel. The access to this is only available to WordPress Administrators [user role].
- Go to Menus section in Appearance Tab in Admin panel.
- Before building a menu you need to enable the desired Menu items to include in the Menu from Screen options tab located in the top right corner of the screen.
- Click on Create new menu to get started with the menus.
- Give a name to your menu and click Create menu button to create the menu.
- Now select items from the sections in the right and click on button Add to Menu.
- Once items are added to the Menu drag them around to place them one under another. WPLMS supports unlimited menu levels.
- By default the next menu level is shown on hover and towards right.
- For Menus located closer to the right margin, you can add a CSS class leftfor the next level menu item to appear on left side. For this make sure you have enabled CSS classes from the screen options located on top right corner of the screen.
- Mega menus are only available in 1 level menu items.
- Since mega menus are full width menus, to enable a mega menu make sure that only one 1 level item is present in a menu with mega menu.
- To enable Mega Menu, enable the Mega menu switch in the 1st level menu item.
- Select a sidebar/widget area which will be shown in the mega menu. You can create unlimited mega menus and unlimited sidebars/widgetized areas can be created using Options Panel -> Sidebar Manager.
- Select the number of columns in the Mega menu widgetized area.
- Add custom widgets in the selected Mega Menu sidebar/widget area. Mega menu supports all the non-animation widgets. So, widgets with carousels, galleries are not supported in the Mega Menu.
WPLMS supports WordPress 3.0 Menus.
In WPLMS we use the terminology Sidebar for Widget areas in the theme. WPLMS Comprises of 9 sidebars. The 10th sidebar is used for Mega Menu. The sidebars are used in almost all the pages in WPLMS. Although sidebars are configurable for each post type like page, post, course, unit etc. each post type has a default value of the sidebar. Description of each sidebar and the widgets as included in the demo is explained below.
Common FAQs for sidebars
1. Where to set up new sidebar or change the sidebar?
Sidebars can be set up in WP Admin Dashboard->Appearance->Widgets
1. How to create a new sidebar/wigetized area?
You can create unlimited sidebars using Options Panel -> Sidebar Manager.
3. How to set up sidebar like in theme demo?
- Main Sidebar : This sidebar is the default sidebar for all the pages, posts, archive, category pages etc.
- BuddyPress : This sidebar is shown on All BuddyPress pages like All members, All groups, All forums, All courses page.
- Course Sidebar : This sidebar is the sidebar which is shown on single Course pages. The sidebar is located below the course pricing/membership widget.
- Search Sidebar : This sidebar is the sidebar on the default Search page.
- Shop : This sidebar is shown on WooCommerce shop page.
- Product : This sidebar is shown on All Product pages.
- Checkout : This sidebar is shown on checkout page below the coupon widget.
- Top footer Sidebar : This sidebar is shown on Footer top row.
- Bottom footer Sidebar : This sidebar is shown on Footer bottom row.
- Megamenu : This is sidebar created from Sidebar manage in options panel. We'll use this sidebar in creating a Mega menu. Refer to Mega menu section on how to use a sidebar for mega menu.
The sidebars used in WPLMS theme demo are as follows:
Widget : BuddyPress Course Widget
BuddyPress Course Widget is a multipurpose widget which is used to show information about courses. The Course widget has following paramters
- Widget Title : The widget title which appears above the widget in the sidebar.
- Style : Select out of 3 style options :
- Single : Display one course snapshot at a time. If display courses count is more than one then each course snapshot appears below the other.
- List : The courses are displayed in a list view. Each list item contains course image 64px in width, aligned to left and course title with course categories.
- Carousel : Displayes one course snapsop at a time. However, if display courses count is more than one then more courses can be scrolled over in the same space in a coursel format.
- Select course category : (Optional), if you want to show courses from a specific category then select a existing course category.
- Order By : Select order by for selecting courses from the course directory in an order. The order by clause currently supports :
- Name : Order by course slug
- Course Title : Order by course title
- Number of Reviews : Order by number of course reviews
- Date Published (default) : Order by date published
- Rating score : Order by rating score
- Number of Students : Order by number of students in the course
- Sort : Sort order for the orderby clause helps in refining the list of courses with the order by clause. Supports two values, Ascending, Decending (default)
- Specific Courses : If you want to display specific courses in the widget, enter their comma saperated course ids in the order in which you want to display them in the widget. If courses are entered in this field, it will overwrite all the order fields. Course ids are standard post ids.
- Number of courses to show : Select the number of courses to display in the widget. Only valid if no value is entered in Specific courses.
Widget : BuddyPress Instructor Widget
Buddypress Instructor Widget is used to show any particular Instructor in the Sidebar. If this widget is placed in the course sidebar then the widget will automatically display the course instructor details.
- Widget Title : Enter the title of the widget you need to display.
- Fallback Instrcutor Id : Enter the fallback instructor id. The widget would display the details of this instructor when placed in non-course sidebar
- Number of course by the instructor to show : How many courses you want to show of the particular instructor.
Screenshot Walkthrough
![]()
![]()
Widget : BuddyPress Course Search
Buddypress Course search Widget is used to show the course specific search with two select boxes. One for instructor and other for course categories. This is an advanced search built only for courses.
- Widget Title : Enter the title of the widget you need to display.
- Show Course category dropdown : Display dropdown of all course categories, to filter the result only from this category.
- Show Instructor dropdown : Display dropdown of all instructors, to filter the result only related to courses published by the selected instructor.
Screenshot Walkthrough
![]()
![]()
Widget : Course Categories
This widget displays the list of course categories available in the setup. The categories are displayed in a standard list format.
- Widget Title : Enter the title of the widget you need to display.
- Order By : This parameter governs the order of the Course category list. Course categories can be displayed in order related to :
- Name : The display name of the category
- Slug : The permalink slug value of the category
- Course Count : The number of courses in the course category
- Sort Order : This governs the sort order of the displayed result along with the order by parameter. Supports ascending or decending .
- Exclude Course Category Terms Ids (comma saperated): : By entering specific Course category ids, these course categories can be excluded from the resulting list. refer below screenshot on how to get course category id. Go to LMS -> Course Category and edit the category
Widget : Vibe Certificate code validator
This widget is used to validate a certificate code for a student. A certificate code is generated on the certificate and this code can be used to validate a certificate for a user using this wiget.
- Widget Title : Enter the title of the widget you need to display.
Screenshot Walkthrough
![]()
![]()
Widget : WPLMS Events Widget
WPLMS Events Widget comes packed in the WPLMS Events plugin. This widget is useful in displaying event information. Events information is shown in form of an Event card.
- Widget Title : Display's the title of the widget
- Date Range : Select a date range for which events should be displayed
- Shown events Starting in range : Show Event cards for events whose starting date lies in the given date range.
- Show Events Endingin range : Show Event cards for events whose ending date lies in the given date range.
- Style : The events can be displayed in three different styles :
- Single : Display one event card at a time. If display events count is more than one then each event card appears below the other.
- List : The events are displayed in a list view.
- Carousel : Displayes one event card at a time. However, if display events count is more than one then more events can be scrolled over in the same space in a coursel format.
- Select Event type : Select an Event category to display events.
- Order By : Currently supports three formats, published date, Random or Name
- Sort : Sort the above selected order by in Ascending or Decending
- Specific Events : Enter the event ids of the event which you want to in the widget. Event ids are standard post ids of event posts.
- Number of Events to show : Set a maximum limit on number of events which can be displayed in the widget.
- Show course events (on course pages) : Force widget to select the course automatically when displaying a course page. So, the widget would display the events of the displayed course if placed in the course sidebar.
Screenshot Walkthrough
![]()
![]()
Widget : VibeTabs
Vibe Tabs is an inbuilt tabbed widget for showing various information in tabbed format. The widget supports 3 tabs and 3 type of information formats
- Thumbnail posts : the recent posts are displayed in a list format with their feature images , post title and post category
- Course : the recently published courses are displayed in a list format with Course title and Course category
- Comments : Latest comments are shown in a list format with user image and the post name on which the comment was posted.
Widget : Vibe Posts
Vibe Posts is useful for displaying posts in a list , single or carousel format. Vibe posts is a multi functional widget which can be used for any custom post type, like courses, units, quizzes, forums, replies, topics etc.
Widget : Vibe Testimonial Widget
Vibe Testimonial Widget is used to show any particular Testimonial in the Sidebar.
- Enter a Widget Title.
- Select an already existing testimonial (Testimonials can be created in WP Dasboard -> Testimonials section)
- Testimonial excerpt length. If testimonial excerpt is more than this length then a read more link is automatically appended to the excerpt.
Screenshot Walkthrough
![]()
Widget : Vibe Twitter Widget
Vibe Twitter Widget is based on the latest Twitter API 1.1 . So, you need to have the OAuth credentials before hand to use the API. In case you do not have the OAuth credentials follow Step 2, 3, 4.
Refer to this linka> on how to configure Twitter Widget.
Configuring Twitter Widget
Widget : Vibe Flickr Widget
Using Vibe Flickr widget you can show your latest flickr gallery.
Refer to this linka> on how to configure Flickr Widget.
Configuring Flickr Widget
Screenshot Walkthrough
Uploading the Theme
Vibe Options Panel or WPLMS options Panel is located just below the Appearance section in WordPress admin panel. The panel contains a lot of controlling options for theme.
Notices and Updates
Notices and updates are available in the Help section located in top right section of the screen.
- This section contains important links for help, support.
- Any important update and bug fixes are mentioned here.
- New features added in the theme and links to their documentation are added here.
Getting Started
This section consists of the most important setting for the Theme. The theme requires your Themeforest credentials for Auto-Update system. You need to enter your Themeforest username and Themeforest Buyer API key for this.
To know more on how to get an API key, refer to this screenshots:
![]()
![]()
The options in this section controls the header part of the theme. It has some important controls like :
- Upload Logo : Upload or chose an image from the Media gallery as your site logo
- Upload Favicon : Upload or chose an image from the Media gallery as your favicon
- Fix Top header on scroll : Fix the top header which has the login controls, on site scroll.
- Navigation search as Course search : Enabling this option would force the default search in main menu to search for entered text only in courses. The result of this search is displayed in a special course search page.
Screenshot Walkthrough
![]()
![]()
This section deals with Widget areas or sidebars. This functionality allows you to create unlimited sidebars in the theme. These sidebars are particularly useful when you want to have custom widget area/sidebars for a course, page or post.
All Events page sidebar : If you're using WPLMS Events and you want to assign a different sidebar to all events page then use this option.
Screenshot Walkthrough
![]()
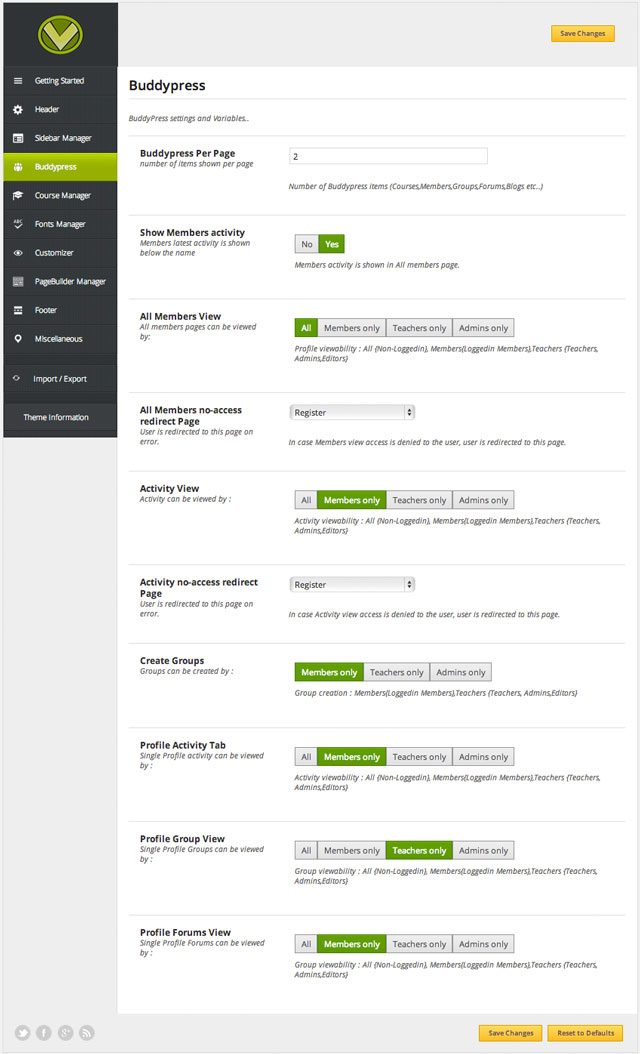
BuddyPress
A lot of functionality has been built in the theme related to BuddyPress. Following parameters allows a user to effectively control privacy in BuddyPress.
- BuddyPress items per page :Number of items shown in single loop for BuddyPress components. Like number of members per page, number of groups shown per page, number of courses shown per page.
- Show Member Activity: Members activity is the status message they can post using the activity page in their profiles. This activity message is shown below their avatar and user names. This is a site-wide setting.
- All Members View : Control who all can view all members in your BuddyPress site.
- All Members No-Access Page : The redirect page for users who are not allowed to access the All Members page.
- Activity View:Control who all can view all activity in your BuddyPress site.
- Activity No-Access Page: The redirect page for users who are not allowed to access the Activity page.
- Create Groups: Control who can create groups. All Members or All Instructors or Admins only.
- Profile Activity Tab: Control visibility for Activity tab in user profile.
- Profile Group Tab: Control visibility for Groups tab in user profile.
- Profile Forums Tab: Control visibility for Forums tab in user profile.
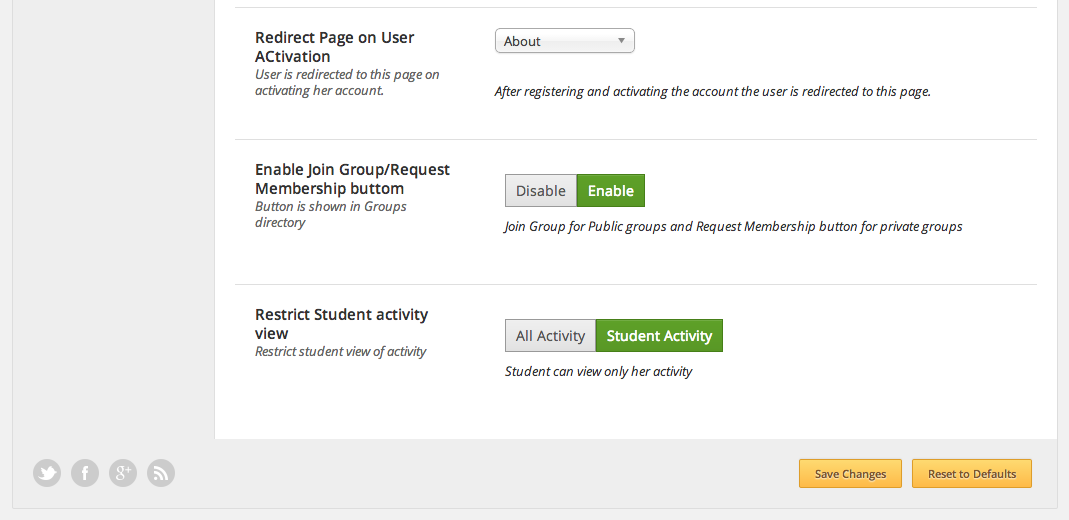
- Redirect Page on User ACtivation : When a user registers via BuddyPress registeration form and activates her account from the activation link in email, she is redirected to the page selected in this option.
- Enable Join Group/Request Membership button : A Join group button will appear in public groups in group directory and a Request membership button will appear in private groups in group directory.
- Restrict Student activity view : If enabled when student views activity page she only sees her activity. If disabled student can view all activity of all members on site.
- Student Field :Select the custom user profile field for students. This information is shown besides a student name. This could be any field like Location as in demo. User profile fields are created using WordPress User -> Profile fields interface.
- Instructor field :Select the custom user profile field forInstructors. This information is shown besides a Instructor name. This could be any field likeExpertise as in demo. User profile fields are created using WordPress User -> Profile fields interface.
- Instructor Field group This extends the BuddyPress profile fields group functionality. If you do not want certain fields to be available only for students and not to be shown to students in profile edit screen, then add the instructor only fields in a BuddyPress profile field group and enter the field group value in this section.
- Instructor Description Field: This custom user profile field is used by various widgets and sections where ever Instructor description is required.
Screenshot Walkthrough
Course Manager
All important settings related to course manager plugin and WPLMS theme.
- Take this course page : Select a Page with Start Course Page template. The page should have some content, like instructions for students on how to mark units complete and how to proceed to next unit. This content is shown when students begins the course.
- Create a Course Select a Page with Create Content page template. This page is required for Front end course editing. Refer Front end Course creation video tutorial
- Notes & Discussions page Select a Page with Botes & Discussions page template. This page is required for Notes and discussions feature. Refer video tutorial
- Admin Approval for Course While creating units form the Front end, this settings allows instructors to publish the course directly or keep the courses in pending state for Admin approval. Once this setting is on, to approve a course for the site, the administrator has to manually change the status of the course from Pending to published.
- Unit Locking If this setting is on then wplms forces the student to finish all the previous units in a course curriculum before viewing the next unit.
- Unit Media Locking : If this setting is on, then wplms would force the unit to first watch the embedded video/audio before marking the unit complete. This feature is only avialable for embeded media files only.
- Assignment Locking This setting forces the student to first complete the connected assignment before marking the unit as complete.
- Private Courses If a course is not connected to a product, it will show as private course. To rename the label of Private course see this tip in forums. To connect a private course to a custom page, refer this tip.
- ProgressBar This switch enables a course progress bar. Course Progressbar is shown above the Course timeline in the start course page.
- Instructor can Add Students This switch enables instructors to manually add students to their courses. The functionality is located in Course Admin members section.
- Instructor can Assign Badges and Certificates This switch enables instructors to manually assign and remove course badge and certificates to students for their courses. The functionality is located in Course Admin members section. Note : Using this functionality does not generate time values, so the certificates do not show a course completion date value.
- Force Instructor Content privacy This is a very inportant switch, it enables privacy among instructors. When this switch is enabled, an instructor can not see other instructors units, courses, quizzes, questions and the uploads library while creating content.
- Become a Teacher Page : Select any page which you want to shown when user click on Become a teach button. This is an important page and is shown at various places like the All instructors page.
- Certificate Page: Select the Page with Certificate Page Template.
- Auto Evaluation Question types Extend the autoevaluation functionality. The Auto-Evaluation question types selected here are used in autoevaluation.
- Instructor Form ID : If you want to automate instructor signup then use this field. You need to install Ninja forms plugin and create a form for instructor signup, make sure that the signup form also creates wordpress user. Connect the signup form id here. Check the video tutorial here.
- Linkage This is a very important functionality, highly recommended when the content in the lms system grows big. Refer to this link for linkage video tutorial.
Fonts Manager
Fonts manager allows you to embed Custom fonts or Google fonts in the theme. The font manager provides the list of fonts to the Theme customizer where the user can select and switch between fonts and see its effect "Live" on theme sections.
Since Google web fonts list is updated from time to time, the reset Google fonts refreshes the font list, so the theme always has the latest Google font list.
The Custom Web Fonts interface allows a user to enter custom fonts to the Theme customizer. These fonts could be manually embedded fonts from the theme stylesheet.
Screenshot Walkthrough
![]()
Customizer
This is the Import/Export panel for Theme customizer. All the Theme customizer settings can be saved, imported/exported for later user. This provides additional flexibility to the theme. You can save various color combinations for the theme and can save it and use it.
Screenshot Walkthrough
![]()
PageBuilder Manager
This is the Import/Export panel for Page Builder Saved Layouts. All the paged built using Page builder can be saved through the page builder interface which can be imported/exported using this interface.
Screenshot Walkthrough
![]()
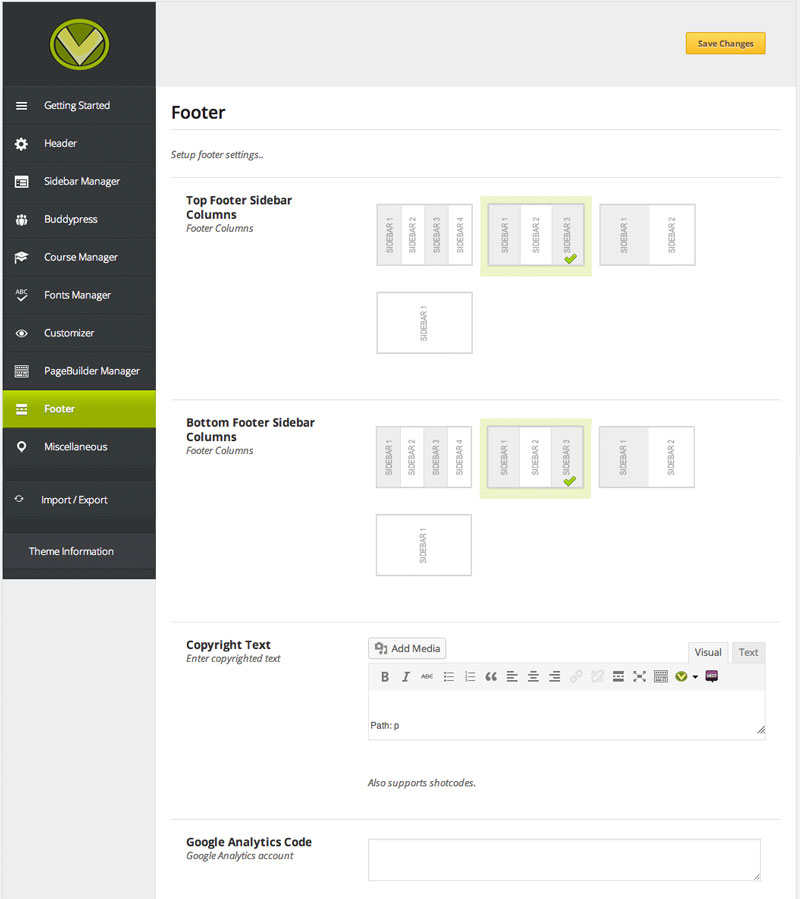
The footer comprises of two widget areas/sidebars and a Footer bottom layout. Each widget in a footer sidebar is placed in a column (sidebar). So, a 4 column footer sidebar shows 4 widgets in width and the fifth widget starts below the first one.
The following controls allow the user to control the footer appearance.
- Top Footer Sidebar Columns: Number of Widgets in one Row in Top footer sidebar.
- Bottom Footer Sidebar Columns: Number of Widgets in one Row in Bottom footer sidebar.
- Copyright Text: Copyright text is shown in Footer bottom , left side of the footer menu.
- Google Analytics code: If you want to track your pages using Google analytics, place your Google analytics code with the javascript script tags here. This area can also be used to run any custom javascript throughout the site.
Screenshot Walkthrough
Miscellaneous
Important controls used in the Theme.
- Default Excerpt Length : Length in number of words, for excerpts shown throughout the theme. The excerpts controls the, excerpts in the post category, excerpt in post search, excerpt in Testimonials etc.
- Contact Page Latitude and Longitude values: Controls for Contact Page Template. Use this link to grab Laitude and Longitude values.
- Contact Page Map Style: Select Satellite view or RoadMap view for Google map shown on Contact page.
- Select a 404 Page: Set a 404 page for the not found pages.
Screenshot Walkthrough
![]()
Import/Export
Use these controls here for saving, importing and exporting all the option settings in the Vibe Options Panel. For quick setup guide we have imported settings using this control from the Demo using the same Import/Export controls.
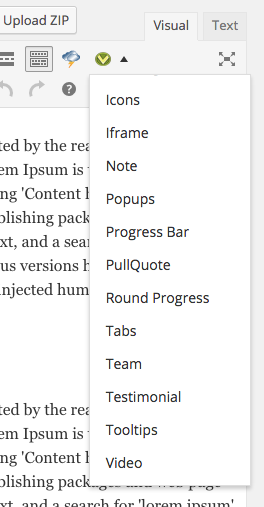
WPLMS has more than 60 inbuilt shortcodes with almost unlimited options, most of the general shortcodes are available in all WP Editors through the ( v ) icon.
General shortcodes
The general shortcodes are available via the ( v ) icon in the shortcode bar. The shortcodes are as follows :
- Accordion : This shortcode is useful for creating accordions. Simply select the accordion section in the ( v ) shortcode dropdown and start building an accordion. This shortcodes accepts one parameter "first" setting this to 1 opens the first accordion on the page by default.
[agroup first="0"][accordion title="First Accordion title"] Accordion content [/accordion][accordion title="Second Accordion Title "] Accordion content [/accordion][/agroup]
Note : Important to note that two accordion title should not have exact same title.
- Button : Useful for creating buttons. The shortcode generator has a button generator which can create buttons of various shapes sizes and colors. It has 4 parameters :
- a. URL : the link to which buttons points to.
- b. Style : Select a prebuilt button style of create your own button by using Custom. Base style : picks up theme primary color which is set in theme customiser - theme section, Primary style picks up themes secondary color which is set in theme customiser body section.
- c. Target : Open the button link in new window by setting this to _blank
- c. Anchor : The title of the button
[button url="#" class="" bg="" hover_bg="" size="0px" color="" radius="0px" width="0px" height="0px" target="_self"] Something [/button]
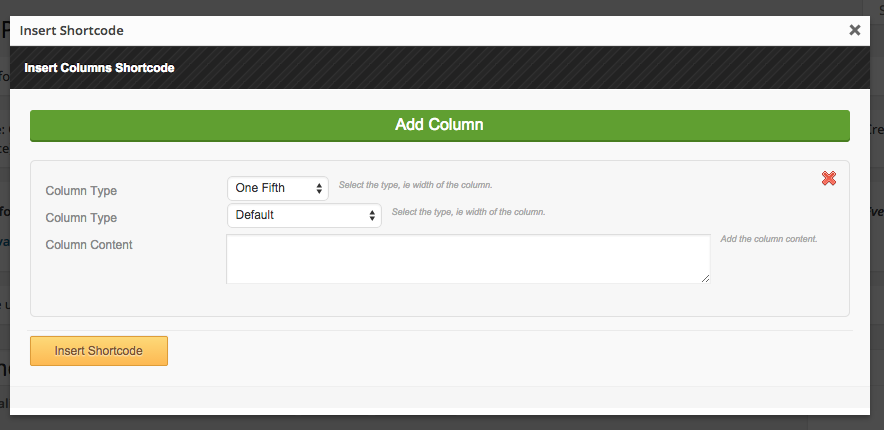
- Column : Useful in creating columns. Can be used to divide a page in 1/5,1/4,1/3,1/2,2/3,3/4,3/5,4/5 sections. The blocks are responsive and turn full width on mobile devices. These are particularly useful in creating blocks in fullscreenstripes or areas where page builder blocks do not work.
[one_fifth first=first] One Fifth [/one_fifth][three_fifth first=] Three Fifth [/three_fifth][one_fifth first=] One Fifth [/one_fifth]
Screenshot Walkthrough
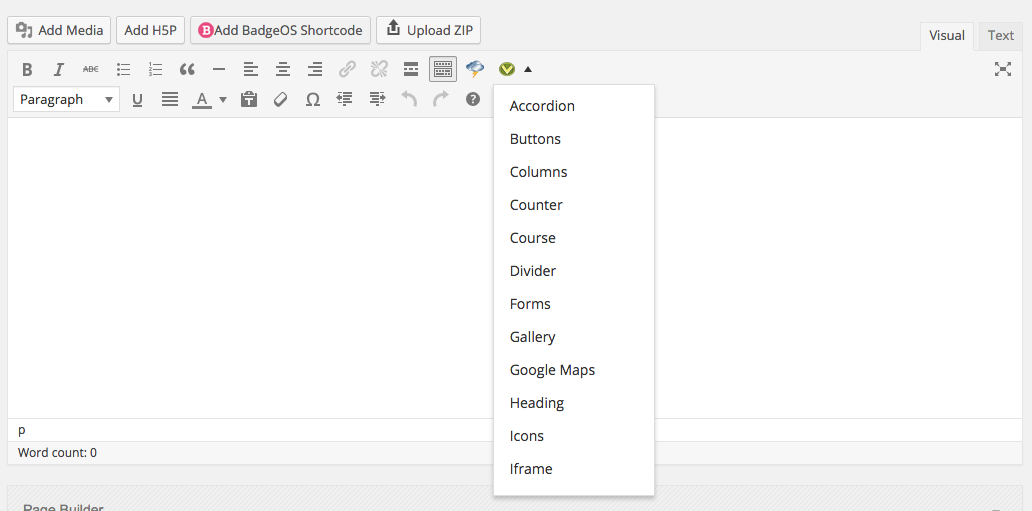
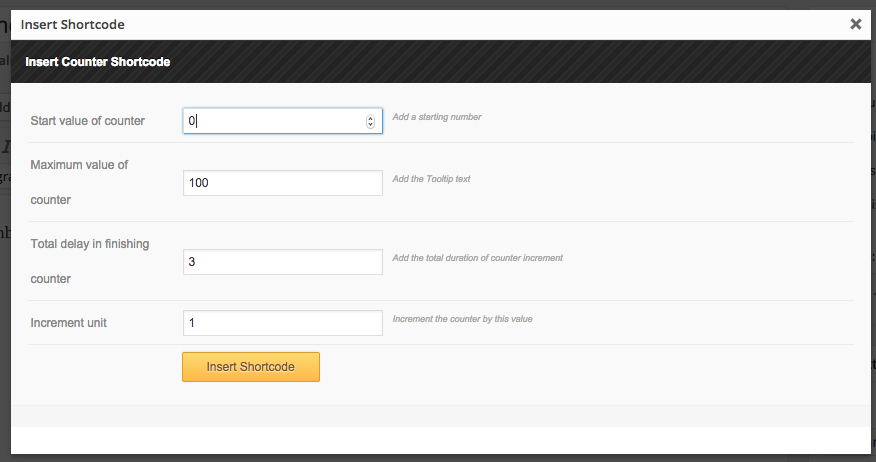
- Counter Adds a incrementing counter on page. The counter starts when the it appears in the view of the user. Accepts 4 arguments.
- a. min : Starting value of counter.
- b. max : End value of the counter.
- c. delay : Start after x seconds
- c. increment : The value by which the counter increments.
[number_counter min="0" max="100" delay="3" increment="1"] [number_counter min="0" delay="3" increment="1"]300[/number_counter] [number_counter min="0" delay="3" increment="1"][vibe_site_stats total=1 number=1][/number_counter]
Screenshot Walkthrough
- Divider : Adds a divider or a horizontal line in the content. Useful for dividing content. Support custom class which can be useful.
[divider style="clear"]
- Forms : Builds a form. Usefule for creating custom forms which can be send to any email/s. You can add custom emails and subject in the mail to identify the form from which the mail is sent. You can also customise the fields and their order. Remember to have a submit button in the form to submit the form.
[form to="example@example.com" subject="Subject"] [form_element type="text" validate="" options="" placeholder="Name"] [form_element type="text" validate="email" options="" placeholder="Email"] [form_element type="text" validate="phone" options="" placeholder="Phone"] [form_element type="textarea" validate="" options="" placeholder="Message"] [form_element type="captcha" validate="" options="" placeholder="Verify"] [form_element type="submit" validate="" options="" placeholder="Send Message"] [/form]
- Gallery : Useful for creating image galleries. Also compatible with default WordPress gallery. Accepts parameters for image sizes.
[gallery ids="234,456,678" size="small"]
- Google maps : Adds a Google map in a page. Grab the iframe code of google map from maps.google.com and add it in the shortocde. Refer screenshots for remo
[map]<iframe style="border: 0;" src="https://www.google.com/maps/embed?pb=!1m14!1m8!1m3!1d3022.5237439932407!2d-73.993439!3d40.750504!3m2!1i1024!2i768!4f13.1!3m3!1m2!1s0x89c25a21fb011c85%3A0x33df10e49762f8e4!2sMadison+Square+Garden!5e0!3m2!1sen!2sin!4v1429253580855" width="600" height="450" frameborder="0"></iframe>[/map]
- Heading : Adds a heading in theme style.
[heading style="center"]This is a heading[/heading]
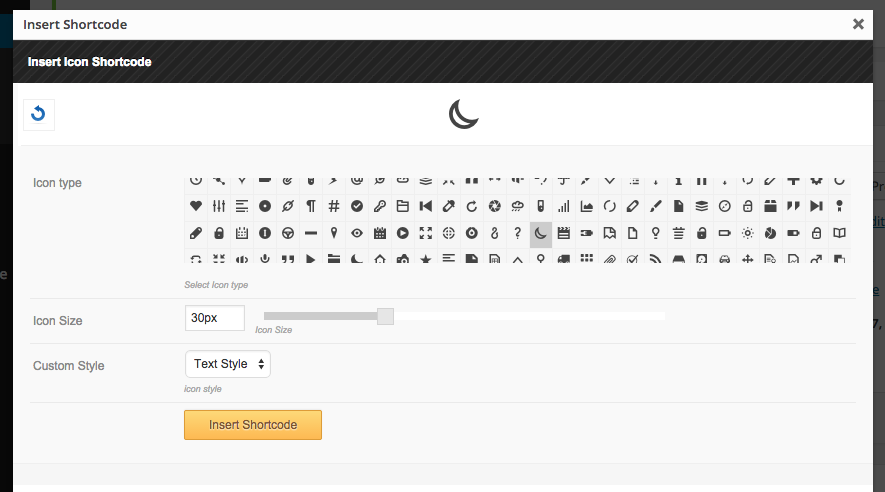
- Icons : Adds an icon from the theme list of icons. Also allows you to customise the icon as per requirements. This icon can be used in various places in conjunction with other shortcodes or as a stand alone.
[icon icon="icon-moon-stroke" size="30px" color="" bg="" hovercolor="" hoverbg="" padding="0px" radius="0px"]
Screenshot Walkthrough
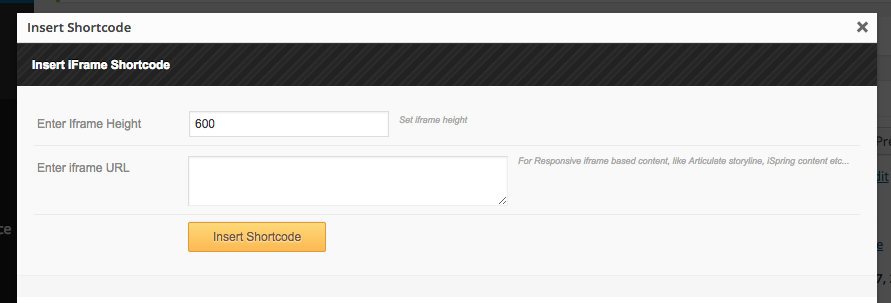
- Iframe : Adds a responsive iframe. Useful in embedding html/pdf files in pages. You can specify the height of the iframe, the height would govern if the scrollbars are shown for the iframe in a page.
[iframe height=600] http://google.com [/iframe]
Screenshot Walkthrough
- Note : Adds a colored notification on page. You can set a custom colored notification on the page.
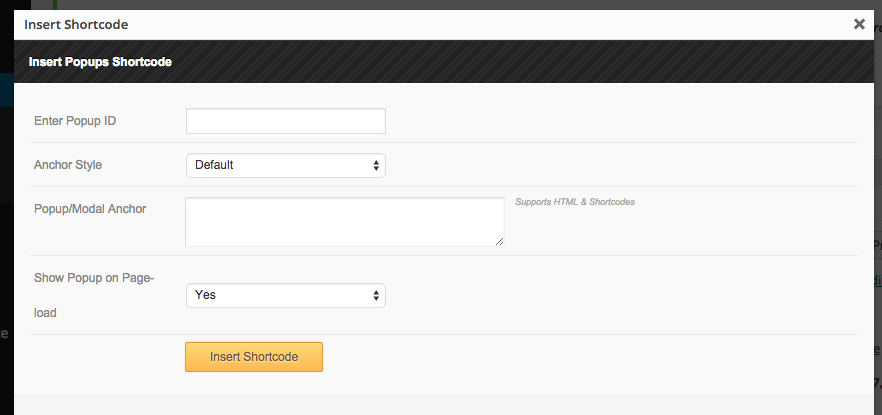
[note style="other" bg="#f61c1c" border="#f62121" bordercolor="{{bordercolor}}" color="#ffffff"] This is a notification. [/note]Note : To center align the text in the notificate use style as "other center". - Popups : Adds a popup on page. Create a popup from WP Admin -> Popups and note the ID of the popup. This id is used in this popup shortcode.
[popup id="3456" auto="1" classes="default"] Popup [/popup]
Screenshot Walkthrough
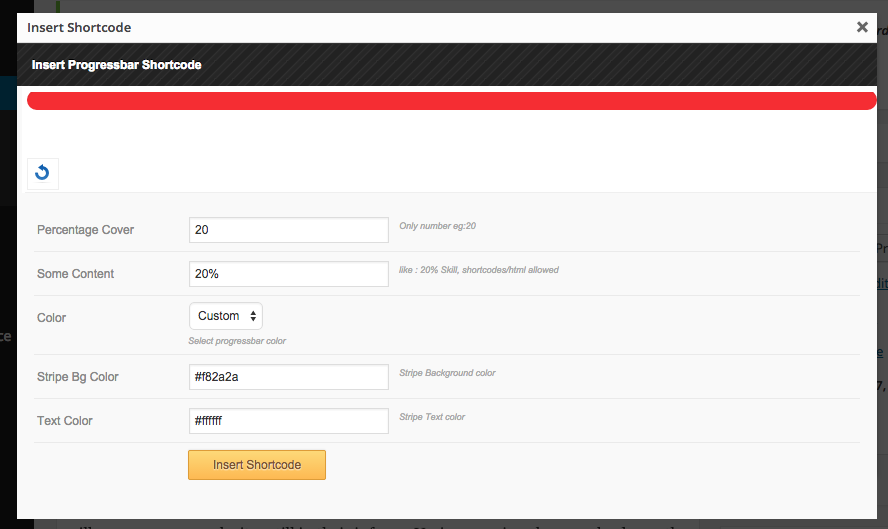
- ProgressBar : Adds a progressbar on page. You can set custom color for the progressbar. By default the color is the primary theme color.
[progressbar color="other" percentage="20" bg= textcolor=] 20% [/progressbar]
Screenshot Walkthrough
- Pull Quote : Adds a pullquote on page. You can select which side the pullquote should be.
[pullquote style="left"]It is a long established fact that a reader will be distracted by the readable content of a page when looking at its layout. The point of using Lorem Ipsum is that it has a more-or-less normal distribution of letters, as opposed to using 'Content here, content here', making it look like readable English. [/pullquote]
- Round Progress : Adds a round progressbar on page.
[roundprogress style="other" color="#e82020" bg_color="#dbdbdb" percentage="20" radius="200" thickness="20"] Progress[/roundprogress]
- Tabs : Adds tabs on page. You can set the tab view to be left or on right or on top of the tabs. The default view for tabs is on top of the content.
[tabs style="" theme=] [tab title="Title One" icon=""] Tab Content One [/tab] [tab title="Title Two" icon=""] Tab Content Two [/tab] [/tabs]
- Team : Adds a team member. Best used with columns shortcode or in a page builder block.
[one_third] [team_member pic="http://xx.com/link-to-member-image.jpg" name="Steve Jobs" designation="CEO"] [team_social url="http://www.vibethemes.com" icon="icon-twitter"] [team_social url="http://www.vibethemes.com" icon="icon-facebook"] [/team_member] [/one_third]
- Testimonial : Adds a testimonial on page. Enter a testimonial ID from WP Admin - Testimonials section. Best used with columns shortcode or in a page builder block.
[one_third] [testimonial id="1049" length=100] [/one_third]
- Tooltip : Adds a tooltip on anchor element.
[tooltip tip="Tip content!"] Tooltip [/tooltip]
- video : Embeds a video on page. Grab the iframe embed code and add it in the shortcode.
[iframevideo] <iframe src="https://www.youtube.com/embed/HURLXtbfKVY" width="853" height="480" frameborder="0" allowfullscreen="allowfullscreen"></iframe> [/iframevideo]
Screenshot Walkthrough
![]()
![]()
Special shortcodes
These are shortcodes for specific usage. Only required for special purposes.
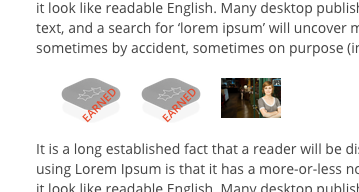
- All Badges : Displays all available badges in the site. The earned badges appear as faded with text as "earned" whereas non-eanred badges appear as colored.
[allbadges]
Screenshot Walkthrough
- instructor : Returns the course instructor widget. Requires ID of the instructor.
[instructor id="1"]
Screenshot Walkthrough
- Course : : Returns the course view. Requires ID of the course.
[course id="1"]
Screenshot Walkthrough
- wpml_lang_selector : Adds WPML language selector
[wpml_lang_selector]
- user_only : Display content to a particular user. Requires user ID or user IDs saperated by comma
[user_only id="1"]
- course_product : Display information of WooCommerce product connected to a course. Requires course ID. Details, SKU returns SKU of the product, Price returns price of the product, sales return total sales count of the product, note returns the information for the product.
[course_product id="1" details="sku"]
Question shortcodes
These shortcodes are required while making questions of different types.
- fillblank : Displays a fill in the blank section in the question content where it is placed.
This is the question, fill this blank [fillblank]
- select : Displays a select dropdown. The dropdown shows the options set in the question.
Select the answer to this question [select]
- match : Displays the grid in which Match elements are put. The match elements are generated from the question options.
[match]<ul> <li>Level1</li> <li>Level2</li> <li>Level3</li> </ul>[/match]
Check this video on all shortcode usage for Quiz question types :
Certificate shortcodes
These shortcodes are required for making certificates.
- certificate_student_name : Displays the name of the student in the certificate
[certificate_student_name]
- certificate_student_photo : Displays students photo in the shortcode or if student id is passed then returns the photo of the user.
[certificate_student_photo]
- certificate_student_email : Displays student email in certificate.
[certificate_student_email]
- certificate_student_marks : Displays marks of student in the course on the certificate.
[certificate_student_marks]
- certificate_student_field : Displays custom information frmo student profile. Requires the name of the field.
[certificate_student_field field="name"]
- certificate_student_date : Displays certificate student date.
[certificate_student_date]
- certificate_code : Displays certificate code for the student.
[certificate_code]
- course_instructor : Displays Course instructor name on the certificate.
[course_instructor]
Site stats shortcodes
These shortcodes are required if you want to display site stats on pages.
- vibe_site_stats : Displays site stats.
Parameters: total : Displays total number of users in site courses : Displays total number of courses in site instructor : display total number of instructors in site groups : display total number of groups subscriptions : Total number of course subscriptions by all users sales : Total sales amount of courses commissions: total commission earned by instructors posts : Total number of blog posts published comments : Total number of comments on the blog posts
Sample use :[vibe_site_stats total=1 courses=1 instructor=1 groups=1 subscriptions=1 sales=1 commissions=1 posts=0 comments =0]
[vibe_site_stats members=1 number=1]
This will return the total "number" of members, which can be used with the counter shortcode.
WPLMS is deep integrated with WooCommerce, which makes WPLMS a very powerful combination to sell courses online. You can add unlimited WooCommerce plugins, Payment gateways, WooCommerce Affiliate system and take full advantage of it in WPLMS.
WPLMS allows only Administrators to create new products. Each product can be connected to many courses and sold as an individual product or a subscription product.
Creating Products
To create a product simply Login as Administrator in WPLMS site. Follow below instructions to create a new product :
- In WordPress Admin click on Products -> Add New
- Add a title to the Product and add some description to the product
- You'll notice a Product Course settings meta box, add the desired courses in the metabox
- If you want the Pricing to be considered as a subscription, enable subscription.
- If subscription is enabled then add the subscription days.
- In Product data : General : Mark the product as Virtual and Downloadable.
- In Product Data : Inverntory : Select Sold individually.
- In Product Data : Advanced : Disable Reviews. As this could be confusing for the user.
- Add Product featured image and some gallery images.
- Enter the Price of the Product and Publish the product.
Screenshot Walkthrough
![]()
![]()
Connecting Courses
Once the product is published, you can connect the product back to the course.
A course can be connected to a single product, while a product can be connected to many products.
The connected product is shown when the user clicks on Take this course button in single course screen
Screenshot Walkthrough
![]()
![]()
Managing Orders
Once a student has placed an order, the access to the course in not given untill the order has been marked as complete.
If the student uses Paypal as payment mode then the order is marked complete when user migrates from the thank you page. So, Paypal as payment mode works as expected which we have tested on the Demo site as well. However, same is not valid for other Payment modes.
For Payment Modes like Bank Transfer, Cheque the Administrator has to Manually Approve orders in WP Admin -> WooCommerce -> Orders Section
To Approve an order Administrator clicks on the Tick in front of the order to mark the order complete. Once the order is marked complete only then the Student gets access to the course.
WPLMS Events is the latest addition to WPLMS Features. Please note important pointers to avoid some potential issues while using WPLMS Events plugin :
- Install the WPLMS Events Plugin in the package
- Save the Permalinks again with setting %postname%
- Clear your Browser Cache
Creating Events
Inviting Students
WPLMS Events Widget
Instructors are na essential part of WPLMS. To become an Instructor the Administrator has to manually change the user status. However, we're open to ideas in this domain. Please share your ideas on this front form the Feature requests link the footer.
Creating Instructors
An Instructor has to first register on site as a student.
Administrator then goes to WP Admin -> Users
Searches for Instructor and Changes the role from Student to Instructor
Now the Instructor can login to WP Admin and create courses.
Screenshot Walkthrough
![]()
Admin stats is present in the WP Admin panel -> LMS -> Statistics section. This area of Statistics is only accessible to Administrator. The Stats section comprises of 3 further subsections as follows
Overview
Overview comprises of graphical representation of number students starting new courses in the WPLMS
Overview shows critical information about the LMS as total number of students, total number of instructors,total number of Courses taken by students, total number of Badges awarded to students and total number of certificates awared to students.
The graph depicts a growth chart of number of students entering and starting the courses in the site.
The graph can also be set from a daily graph to a monthly graph to a custom date graph to check the growth levels in particular duration in WPLMS.
Courses
All the vital information regarding courses can be seen in this section. Each course with Number of students in it, number of certificated awared in this course, number of badges awarded in this course and the average score of students in this course.
Total number of students taking courses
Total number of students who have started a course
Total number of courses finished by students
Total number of units in courses completed by students
Total number of quizes finished by students
Instructors
All the vital information regarding Instructors can be seen in this section. Each Instructor with Number of Courses, number of certificated awared by instructor, number of badges awarded by instructor and the average score of students in this Instructor's course and total number of students in thsi Instructors courses.
Total number of courses taught by instructor
Total number of students taking instructor's courses
Total number of badges awarded by Instructor
Total number of certificates awarded by Instructor
Average score of Students in courses by Instructor
Admin or instructor can create certificate for courses by going in Admin dashboard -> LMS -> Certificate Templates section
Creation
A certificate template can be created by going in Admin dashboard -> LMS -> Certificate Templates -> Add New. You can add all the design or text here to your certificate. Learn More+
Certificate Template Shortcodes
Here are some shortcodes You can use to display relevant dat in your certificate:
[certificate_student_name] : Displays Students Name
[certificate_student_name]
[certificate_course] : Displays Course Name
[certificate_course]
[certificate_student_marks] : Displays Students Marks in Course
[certificate_student_marks]
[certificate_student_date] : Displays date on which Certificate was awarded to the Student
[certificate_student_date]
[certificate_student_email] : Displays registered email of the Student
[certificate_student_email]
[certificate_code] : Generates unique code for Student which can be validated from Certificate page.
[certificate_code]
[course_completion_date] : Displays course completion date from course activity.
[course_completion_date]
[certificate_student_photo] :Displays students photo in the shortcode or if student id is passed then returns the photo of the user..
[certificate_student_photo]
Certificate Template Settings
Background Image/Pattern : To set background of a certificate
Enable Print & PDF : To enable/disable print or save pdf of certificate
Certificate Width : To set width of certificate
Custom Class : To give custom class to certificate template
Custom Css : To give custom css to certificate template
After creating a certificate template it can be assigned to a particular course
Screenshot
![]()
Assigning Certificate to a course
1)From Admin panel : While editing or adding a course goto Course settings -> Certificate Template
2)From Instructor dashboard : In course settings goto Course Certificate
Screenshot
![]()
![]()
Note : If a student completes her course before admin or instructor creates a certificate for a course then the certificate to that student will not be available automatically if he/she passes.However instructor or admin can award a certificate to that student from members section in admin area of instructor by using option - "Assign badges/Certificates" to student.
Screenshot
![]()
![]()
Source: https://www.familyhistorywritingstudio.com/wp-content/uploads/js_composer_envato_package/WPLMS%20Package/documentation/theme-guide.html
0 Response to "Wplms Continue Course Not Working When Student Logs Out"
Post a Comment